Pages

Showing posts with label Cake. Show all posts

Sunday, March 30, 2014

How to make Peanut Chikki

Ingredients
Peanuts - 1 cup (roasted)
Sugar/Jaggery/Brown sugar - 3/4 cup
Cardomon Powder - 1/4 tsp


Method
1. Melt the sugar/brown sugar in a non-stick pan till it turns honey brown in color.
2. Crush the peanuts and add it to the melted sugar with a pinch of cardomon powder.
3. Put this mixture immediately into a greased plate or tray.
4. Spread it to the desired thickness using a rolling pin.
5. Immedietly cut it with a greased knife.
6. After it cools, separate the pieces and store in air tight containers.

Tips
- You can make the same chikkis with sesame seeds, cashews and other nuts too.

How to Gulab Jamun

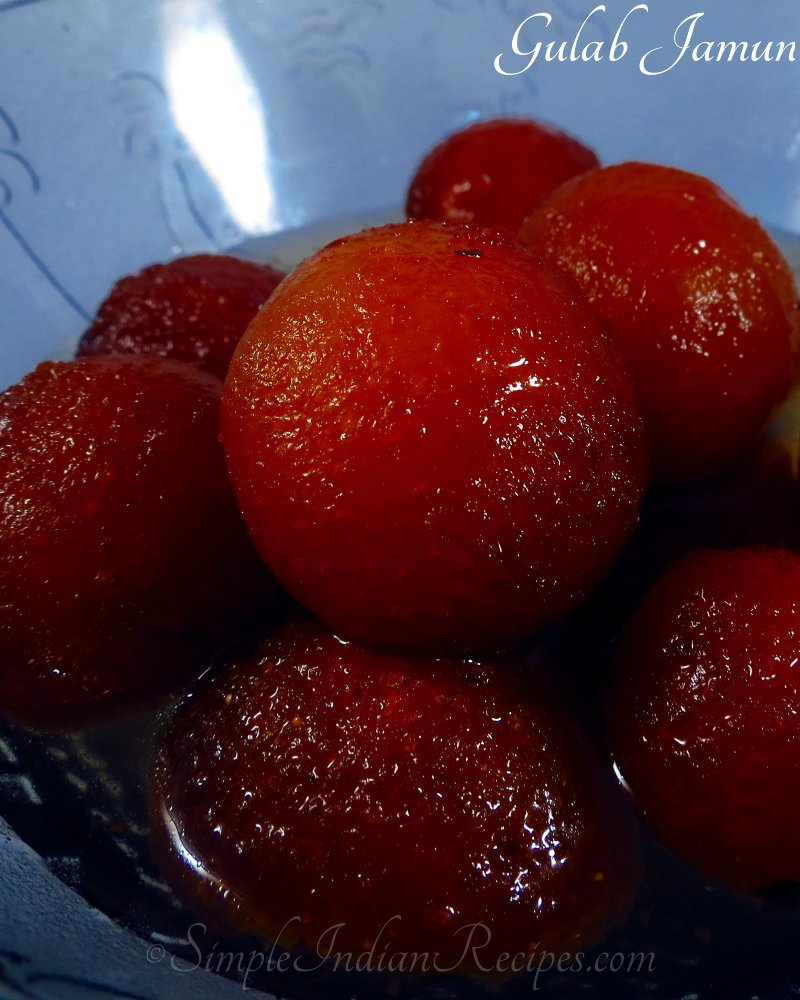
Gulab Jamun is a very popular dessert from India. It is also found in Pakistan, Sri Lanka and Bangladesh. It is very commonly made during festivals, marriages and other celebrations. Gulab (rose) jamun gets its name from the rose colored jamuns (dumplings) that are soaked in sugar syrup. These sweet dumplings made with milk solids are very light and melts in your mouth right away. It is very simple to make and tastes delicious.

These days gulab jamuns are widely available in cans and in all shops. You can also make gulab jamuns with the instant gulab jamun mix readily available. But why not make it at home when it is so simple to make and requires very few ingredients?. Here I have shared the recipe and tricks to make the perfect Gulab Jamun in your own kitchen.

IngredientsFor the Jamun balls
Milk Powder - 1/2 cup
Maida (All purpose flour) - 2 tsp
Rava (Semolina) - 1 tsp
Baking Soda - 1/4 tsp
Milk - 2 tbsp
Lemon Juice - 1/2 tsp
Ghee or Butter - 1 tbsp

For the Sugar Syrup
Sugar - 1.5 cup
Water - 1.5 cup
Rose Essence (or rose water) - 1 tsp
Cardamom Powder - 1/4 tsp
Lemon Juice - 1 tsp


Method
For making Sugar Syrup
1. Take the sugar and water in a sauce pan. Boil it.
2. Reduce the flame and let it simmer for about 5 minutes.
3. Add the lemon juice, rose essence and cardamom powder to the syrup.
4. Switch off.

For making Jamun Balls
1. In a mixing bowl, take the milk powder, maida, baking soda and rava. Combine it.
2. Add the lemon juice and butter/ghee and mix it well till you get a crumbly flour.
3. Add the milk and mix it. The dough may appear to be very sticky.
4. Let it rest for about 5 minutes. By now most of the moisture is absorbed by the dough.
Tips : If you feel the dough feels dry, add a few drops of milk. The dough should be soft and moist. Only then you will get smooth balls without any cracks.
5. Divide it into equal portions. Make smooth balls with your palms. Make all the balls and keep it covered under a damp kitchen towel to prevent them from getting dried up.
6. Heat oil in a frying pan and fry on medium low heat till it becomes golden brown. It is important that you fry on low heat so that the balls are cooked through.
7. Put the fried jamun balls in the warm sugar syrup. Let it soak for 45 minutes to an hour. Yummy gulob jamun is ready.


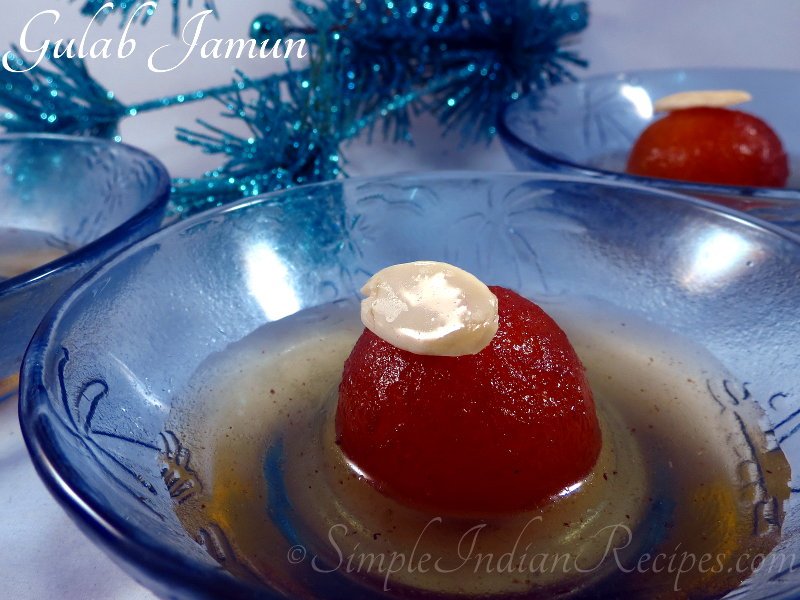
Gulab jamun topped with sliced almond

Variations
- If you find fresh mawa or khoya, you can make the jamun balls by combining 3/4 cup of khoya with 1/4 cup of maida, 1/4 tsp of baking soda and about 1 tbsp of water.
- Another simple way of making jamun balls is by using readymade Gulab Jamun mix. You just have to follow the package instructions. - If you add sugar while making the dough, the jamun balls will turn almost black in colour while frying. This is yet another famous dish called "Kala Jamun".

Kala Jamun


Serving Suggestions
- The best part about Gulab Jamuns is that it tastes good either served warm or when served cold. During winter, you can serve it warm by microwaving it for few seconds before serving. Otherwise, just refrigerate and serve chilled.
- Some people prefer to have warm gulab jamuns topped with cool vanilla ice cream.
- Some people prefer to have gulab jamuns with lot of sugar syrup while other like it dry. If you prefer to have it dry, remove the jamuns after soaking in the sugar syrup for an hour. Arrange it in a serving dish and top it with sliced nuts to make a beautiful presentation. You can also roll it in sweetened coconut and serve it.

However you serve, make this dessert today and enjoy!!!

Gulab Jamun rolled in coconut powder

How to cook Broccoli Bajji

Broccoli is a plant that resembles cauliflower and belongs to the family which also includes cauliflower, cabbage, brussel sprouts, collards and kale . Broccoli has many green coloured fleshy flower heads, on a thick, edible stalk. The entire thing looks like a mini tree.
This food is very low in saturated Fat and cholesterol but a good source of Protein, dietary Fiber, Vitamin A, Vitamin C, Vitamin K, Vitamin B6, Folate, Potassium, Vitamin E, Thiamin, Riboflavin, Pantothenic Acid, Calcium, Iron, Magnesium, Phosphorus and Selenium and Manganese. Most important, broccoli contains a substance called Isothiocyanates, which fight and help prevent cancer.
Bajjis are traditional south indian dish prepared for special occasions. It is very common in any street fares and sea shores. There are various types of bajjis and making them is less time consuming. You can substitute different vegetables instead of broccoli to get different bajjis like potato bajji, cauliflower bajji, onion bajji, raw banana bajji, mirchi bajji (milagai bajji), appala bajji etc.

Ingredients
Gram flour - 2 cups
Rice flour - 2 tblsp
Red chilly powder - 2 tsp
Baking soda - 1 pinch
Salt – to taste
Broccoli – 2 cups (separated into florets)
Water - 1/2 cup
Oil - 1/4 cup ( for frying)


Method
1. Mix thoroughly gram flour, rice flour, red chilly powder, baking soda and salt to make bajji flour.
2. Add water gradually to avoid lumps and make a smooth paste.
3. Heat oil in kadai. When the oil is hot enough, dump few broccoli florets in the bajji batter.
4. When the florets are completely coated with the batter, put the florets in the oil and deep fry.
5. Drain excess oil in a paper towel. Serve hot with tomato ketchup when the bajjis are crisp.

Tips
- Don’t overcrowd the kadai. Fry few florets at a time.
- Broccoli florets can be substituted with other vegetables like cauliflower florets, onion, potato slices, raw banana slices, bread slices etc.

How to make Spiced fruit & pistachio bread wreath

Spiced fruit & pistachio bread wreath

Ingredients
For the bread dough

250ml whole milk
50g butter, cubed
450g strong plain flour
7g sachet fast-action dried yeast
50g golden caster sugar
1 egg, beaten, to glaze

For the filling
200g currants
50g chopped mixed peel
1 tsp cinnamon
1 tsp mixed spice
zest and juice 1 lemon
zest and juice 1 orange
50g pistachios, chopped
100g butter, softened
2 tbsp golden caster sugar
icing sugar, to glaze

  1. First make the bread dough. Warm the milk in a saucepan until you can see steam coming from the surface, but don’t let it boil. Add the butter and set aside. Tip the flour, yeast, sugar and ½ tsp salt into a large bowl. When the milk has cooled to hand temperature and the butter has melted, pour the liquid into the bowl. Mix with a wooden spoon, then tip out onto your work surface and bring together with your hands. Knead the dough for 10 mins or until soft. Put it in a clean, lightly oiled bowl and cover with a sheet of oiled cling film. Leave somewhere warm for about 2 hrs until doubled in size.
  2. Place the currants, mixed peel, cinnamon, mixed spice, zests and juice into a saucepan. Boil hard for a few mins until the fruit has absorbed the liquid and become nice and plump. Chill until cold, then mix with the pistachios, butter and sugar.
  3. When the dough is ready, tip out of the bowl and knead briefly to knock out the air bubbles. Roll out to a 45 x 28cm rectangle. Spread the buttery spiced fruit mixture over the surface of the dough. From one of the long edges, roll the dough to a tight cylinder, then bring the 2 ends to meet, creating a ring. Place on a lightly floured baking sheet with the join underneath.
  4. Using a sharp knife, cut incisions around the outside of the dough, about 3cm apart, in a sunburst pattern, going quite close to the centre, but not all the way through. Working your way around the outside, pull each piece of cut dough out a little, then push it down on one side, so that the cut edge is exposed and they’re on a curve to create a fan shape around the edge of the wreath. When you’re happy with the shape, re-cover with oiled cling film and leave to prove for about 45 mins until doubled in size. Heat oven to 200C/180C fan/gas 
  5. Uncover the bread and brush all over with beaten egg. Bake for 25-30 mins until golden and hollow sounding when tapped on the base. Mix a little icing sugar with enough water to make a smooth runny icing. Whilst the bread is still warm, brush the icing over the surface with a pastry brush to make a sugary crust. Best eaten within 3 days.